In this article, we will share with you the complete guide to Shrinkage Test…
The Fabric Breaking Strength and Its Testing
Table of Contents
Ⅰ Fabric Breaking Strength
Fabric breaking strength is also can be called tensile strength, which refers to as the maximum tensile force when the specimen is stretched to break. It is one of the main standards to assess the intrinsic quality of textiles. The unit of fabric breaking strength is “Newton (N)” and it is used to evaluate the capability of the fabric to resist to tensile damage.
Ⅱ Breaking Strength Testing
- Testing instruments and materials
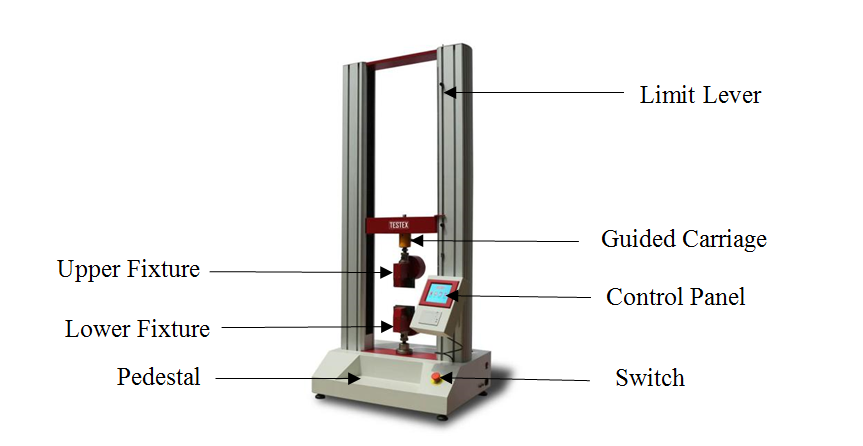
Textile tensile testing machine(Picture 1),a number of woven fabrics, fixtures, pre-tension, etc. .
- Testing principles
A sample of a predetermined size is stretched at a constant elongation rate until it breaks, and record the breaking strength, elongation at break, etc.
- Testing methods
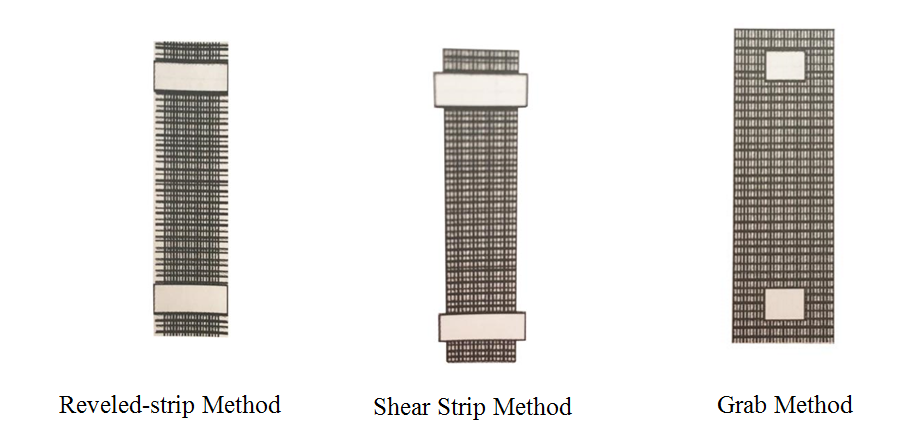
The common testing methods of breaking strength include reveled-strip method, grab method, shear strip method. (Picture 2) For the testing of woven fabrics, the reveled-strip method is used frequently. For some fabrics that can not or can not easily remove the edge, such as knitted fabrics, nonwoven fabrics, coated fabrics, etc., they can be tested by shear strip method. The width of the sample must be strictly controlled, otherwise it will greatly disturb the testing results.
(1) Prepare for the samples
Take several pieces of fabrics, the length is about 35cm, the width is about 6cm, then remove the yarn on the edge of the fabrics and make the samples have a width of 5cm, and a length of 30-33cm.
(2)Testing steps
- Plug in and turn on the switch, the screen shows the starting up notification. Press “F4 ” , the screen displays test screen. Start testing in this screen interface and check the testing data.
- Press the “function” key to enter the test method selection screen, press “Fl” and “F2 “to select the testing method (here you can choose the strip method to test). After selecting, press “confirm” key to enter the parameter setting screen; If the test method displaying on the interface currently is the method that you are going to choose, then without changing the test method, you can press the “set” key to enter the parameter setting screen directly.
- Move the cursor and input the relevant parameters. After completing, press the “confirm” key to enter the testing state screen. (Chart1)
- Select the required fixtures for the test and install it on the machine. The upper fixture should be installed below the sensor and connected to the sensor, and the lower fixture should be mounted on the pedestal.
- Move the stopper on the limit lever to the positioning hole corresponding to the test method and lock it to adjust the clamp distance.
- Set the speed of stretching and recovery. Press the “speed control” key to enter the speed setting screen, and input the corresponding parameters by pressing the “F2” “F3” key(“←” “→” key) and the number keys. Then press “F4” key (“confirm” key) to exit the speed setting screen.
Chart 1 The setting of the gauge length and tensile speed
| Gauge Length(mm) | Fabric Elongation at Break(%) | Tensile Speed(mm/min) |
| 200 | <8 | 20 |
| 200 | 8-75 | 100 |
| 100 | >75 | 100 |
- Press the “clear” key (the upper fixture should be without any external force).If the instrument has previous test data, press the “reset” key to clear all data.
- Put the sample strip into the fixture. Place one end of the sample into the clamp of the upper fixture on which the clamp is open and keep the sample vertical to the clamp and swivel the handle to clamp it. Put the other end of the sample into the lower fixture with a little force, and use pre-tension in the lower end of the sample to make the sample straight. The strength of the pre-tension is determined by the density of the sample. (Chart 2) Tighten the lower fixture and remove the pre-tension m
Chart 2 Pre-tension
| The Intensity of the Sample(g/㎡) | ≦200 | >200,≦500 | >500 |
| Pre-tension(N) | 2 | 5 | 10 |
- Press the “Start” button to test. The upper fixture moves upward until the sample strip breaks. If the test strip breaks within the clamp or clamping line, the test is invalid and need to retest.
- After the test, press “Fl” “F2″to check and record the data.
Related Posts


This Post Has 18 Comments
Leave a Reply
You must be logged in to post a comment.
You made some decent points there. I checked on the net for additional information about the issue and found most individuals will go along with your views on this site.
It’s really a good post. I feel sorrow for myself as I have read this good article after a long time it had been published.
I like to share an observation which I have once experienced during conducting tensile test, using strip method. I was conducting test for denim fabrics.
For each direction, for both warp and weft directions, we need to test five specimens. When I was conducting test for weft specimens, elongation at maximum force for first weft specimen was 71% (less than 75%), here gauge length was 200 mm. Strangely elongation at maximum force for second specimen was more than 75% (actually it was 78 or 79%). What gauge length should we set now? Either 200 mm or either 100 mm?
My second question is- let we have decided that gauge length for weft specimen now will be 100 mm. Unfortunately, or for any reason we now see that elongation at maximum force is less than 75%. What should we do now? Should gauge length be set again at 200 mm?
Really thank you! Fantastic.
Really thank you! Fantastic.
super
I can’t believe how great this site is. You keep up the good work. That’s my advice pal.
the time to study or visit the subject material or web pages we’ve linked to beneath the
I loved your article post. Awesome.
Just beneath, are a lot of entirely not associated websites to ours, even so, they may be surely really worth going over.
I loved your article post.Really thank you! Fantastic.
Im thankful for the post. Will read on…
One of our visitors lately suggested the following website.
Thanks so much for the article.Thanks Again. Great.
I value the blog article.Much thanks again. Want more.
I really like and appreciate your blog article.Really thank you! Fantastic.
Really informative article post. Want more.
“I keep listening to the news update lecture about getting boundless online grant applications so I have been looking around for the finest site to get one. Could you tell me please, where could i get some?”
Great, thanks for sharing this post.Really thank you! Will read on…