What is water vapour permeability? The water vapour permeability test measures how well fabrics let…
Digital Thickness Gauge Operation Guidelines
In this article, we will make a detailed explanation of the digital thickness gauge in many aspects, including its definition, application, test principle, and so on.
Table of Contents
What is Fabric Thickness?
Thickness refers to the dimension between two surfaces of a material, including wet film thickness, fabric thickness, coating thickness, and so on. In this article, we are going to talk about the thickness and the way that instruments measure it. It can be found that fabric thickness is mainly related to yarn fineness, fabric structure, and the bending degree of yarns in the fabric, generally in millimeters. Besides, thickness is a parameter of fabric, putting an effect on fastness, warmth, breathability, wind resistance, stiffness, durability, and many other properties of the wearing performance. Textile companies tend to produce and sell various textile products in a scientific and objective way to meet the demands of consumers by making an assessment of the fabric performance which is figured out on the basis of testing the fabric thickness. And with high performance and good quality, the digital thickness gauge can be applied in many industries, enjoying a wide application in most companies nowadays. There are also a variety of thickness gauges used in different industries, such as wet film thickness gauges, metal gauges, sheet metal gauges, coating thickness gauges, and so on.
What is Digital Thickness Gauge?
Digital fabric thickness gauge, also named fabric thickness gauge, is designated to determine the thickness of textiles and textile products. Besides, the digital fabric thickness gauge can be applied to the measurement of the thickness for a variety of woven and knitted fabrics and the determination of the thickness of other uniform thin materials. We can find that the Digital fabric thickness gauge has become one of the functional textile testing instruments in many industries, such as cotton fabrics, knitted fabrics, sheets, handkerchiefs, the paper industry, and so on.
Application scope
(1) metal sheet thickness test
(2) foil and silicon thickness test
(3) textile materials thickness test
(4) paper and cardboard thickness test
(5) solid electrical insulators thickness test
(6) the film, sheet, diaphragm thickness test
(7) all kinds of woven fabrics, knitted fabrics, non-fabrics thickness test
(8) non-woven materials thickness tests, such as diapers and sanitary napkin sheet
The testing principle
The thickness gauge is equipped with a lifting system in which the eccentric wheel rotation is powered by a reversible servo motor, making one end of the drive rod device move up and down while the other end lifts up and down. The lifting system embraces diverse weights so as to exert different levels of pressure. In the test, press down the fabric placed below the instrument under the operation of the lifting system. You need to keep pressing at a constant pressure which is determined by diverse standards in the specified time, generally 10s or 30s. The vertical distance between the parallel surface of the lifting system and the reference plate where the fabric is placed will be recorded automatically. This is also what to test, the fabric thickness. In all, this kind of thickness gauge is characterized by automatic timing and reading with the electronic lifting system and the balance of the lever’s counterweight balance by increasing the pressure directly. Generally speaking, it works under laboratory environmental conditions.
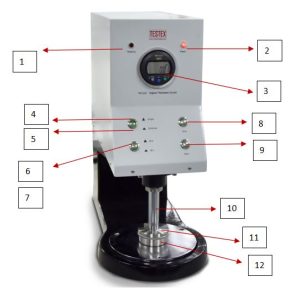
Instrument interface
1 Reading indicator lamp
The reading indicator lamp shows that the test is finished and the result can be read.
2 Power indicator lamp
3 Electronic Display: displays the fabric thickness value under the test
4 Single button
Press the button and then the machine will start to work one time.
5 Continue button
If press this button again, the machine will keep working all the time.
6 The button 10s and 30s
When press the button 30s and the presser foot gets in touch with the tested samples, the machine will stop working for either 30s or 10s.
7 Start button is used for beginning the operation and testing
8 Stop button is designed to make the machine stop working
9 Lifting bars are available to move up and down.
10 Weights
With different weights, there will be different pressure. In general, the weight is equipped with 200 cN, 600 cN,1000 cN and 2000 cN.
11 Presser Foot
It refers to the pressure surface.
If the instrument is equipped with presser feet of different sizes, there will be different pressure areas.
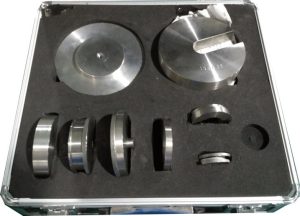
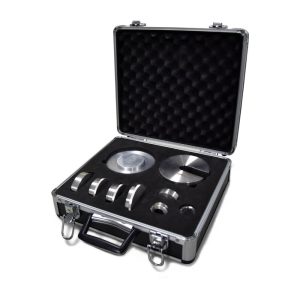
Accessory box, including weights and test heads
Test procedure
1 Sample preparation
Select the sample in a specific way according to related standards and deal with the sample in accordance with the requirements.
2 Start and check the instrument
With the pressing of the start button of the machine, the power indicator lights up. Clean the external parts of the instrument, especially the base level of the test bench, the presser foot, and the lifting bars. Make sure that there is no dust or fiber on their surface. Press the start or stop button and then check whether the lift rod can move without limitations or not.
3 According to the requirements of the tested fabrics, select the area of the presser foot, the pressing time, and weights. Moreover, replace the chosen presser foot and weights.
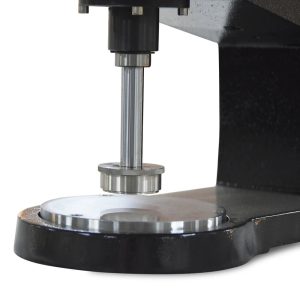
4 Before starting the official test, reset the value shown on the electronic display and the digital centimeter. Turn on the power switch, press the power button, and then the power indicator will light up. According to the requirements of the fabric under test, select the presser foot area and weight. Next press the single button and the start button sequentially so that the instrument can start to work as usual. When the presser foot touches the reference surface and the indicator light is on, press the zero button to reset the value. Press the zero button of the digital centimeter meter several times without fabrics involved. Carry out the official test when the value tends to be zero stably after removing the tested fabric. CMF should not be more than ±0.01mm when pressing the zero button without placing the fabric. But the check of the zero value is not subject to this limitation, especially for the thick fading fabric, which causes the fine fiber possibly stain more on the presser foot or reference plate, resulting in more errors on the back to zero point. However, the test data is free from the effect. Moreover, there is no need to check whether the value is reset to zero if we check it after cleaning the test bench and presser foot. Generally speaking, after checking the resetting situation, the analysis should be made on concrete situations. If there is a slight discrepancy, it is unnecessary to deny the data measured before. If the data measured before keep original or changes a little, there is also no need to disavowal and discard it. But if the data fluctuates too much, it needs to test the fabric again. And when there is a huge deviation in resetting the value to zero, the presser foot, the test bench, or other related instruments should be cleaned. Moreover, the test can be carried out only after the adjustment of the zero value. Note: if the digital centimeter instrument fails to work, please replace the battery.
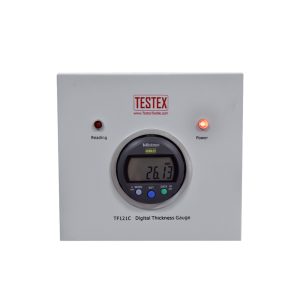
5 Start the test. Select test conditions, and press the Single or Continue 10s or 30s button. Then turn on the power, press the power key, driving the instrument starts to work.
6 When the presser foot is raised, place the fabric under test on the test bench without tension.
7 If press the single button, the following steps need to be taken. For a single test, after the presser foot is pressed on the fabric under test for 10 seconds (or 30 seconds), the Reading indicator light will be on. When the indicator light is on, you need to read the thickness value on the electronic display and record it as soon as possible. Note: If the indicator light is off, the value is invalid.
8 If press the continue button, the following steps need to be taken. For continuous testing, the presser foot will be automatically lifted for a cycle up and down after the reading indicator goes off. At this time, we can move the fabric under test to the new part to be tested during the gap time of the up and down movement of the lifting bar and record the thickness value one by one.
9 After the test is over, remove the fabric under the test. Press the stop button to turn off the power when the presser foot move to the original position(when attached to the test bench). Next, write down the data on the test report. After putting the weights into the accessory box, keep cleaning every part of the machine well and cover the instrument with a piece of cover cloth to prevent dust. Also, note that please place the protective rubber pad between the presser foot and the test bench when replacing the presser feet or the instrument is out of work to protect the facet of measurement from damage.
Test report
The following information should be contained.
(1) The number of tests
(2) The area of the presser foot used.
(3) The weight of the applied weight.
(4) Description of the fabric; the width (or area) of the fabric, the fabric material, the part of the test, etc.
(5) A statement that the test was conducted in accordance with the relevant standards as well as the date of the test.
Note:
The thickness of the textile or textile product is presented as the arithmetic mean, expressed in millimeters and, if required, the coefficient of variation expressed as a percentage, and the 95% confidence limits, expressed in millimeters. Any deviation, by agreement or otherwise, from the procedure specified, and the reason for this.
Some notes about the installation of the Digital Thickness Gauge
1 The instrument is packed in a whole box. During the handling process, avoid laying the wooden box on its side, and inverting the wooden box. Besides, it should be prevented from impact or violent vibration as more as possible during the unpacking process.
2 The instrument should be operated in a clean and dry environment, and placed on a solid foundation without vibration. Moreover, the ambient temperature should be between 10 and 30 degrees with relative humidity less than or equal to 85% in the laboratory environment.
3 When the instrument is transported out of the factory, the testers require this kind of thickness gauge should be available to move flexibly. This thickness gauge is required to move flexibly in using process, so is equipped with a static balance device and lifting bars. However, it is easy to damage such metal gauges when exported out of the factories. In order to prevent the damage caused by the vibration in the transportation, first fixed the counterweight with transport fastening screws and then fixed the lifting bars with anti-vibration rubber pads. Therefore, open the outer cover and then respectively loosen it before opening the machine to maintain its sufficient sensitivity. After opening the box, please save the packed box and the padding materials used in this process which will be used when the thickness gauge is transported to a remote place.
Calibration of the Digital Thickness Gauge
This instrument is a kind of fine-measuring instrument, so it needs to be regularly calibrated. And it should be calibrated for half a year or a year according to the working time.
Calibration items:
1 Check the weight of the weights and presser feet to ensure that the error is less than ±1g per piece.
2 The total clearance of the guiding part of the lifting bar is required to be below 0.05mm which can be checked with a stopper.
3 Use the block gauge to calibrate the accuracy of the centimeter gauge, to ensure that the accuracy of the centimeter gauge is within 0.01mm.
4 Calibrate the balance position and sensitivity of the presser feet. 10cn weights can be added on the presser feet so as to make the presser foot down to the benchmark surface. However, if 10cn weights are not added but placed when lifting the presser feet, the presser foot will fail to be lowered to the benchmark surface or move downward obviously.
5 Check whether the test board surface and the bottom surface of the presser feet are parallel to each other via the presser foot of φ56.43. Apply the plug gauge and electronic centimeter gauge and require the parallelism should be less than 0.01mm. If the parallelism is more than 0.01mm due to the vibration in the transportation, the hexagon key is available to adjust the sample test board. Meanwhile, it is a must to note that every part of the probe shaft assembly should not be loosened.
Precautions for use
1 Turn off the power switch as long as the test is finished. Apart from that, unplug the instrument from the power outlet.
2 Calibrate the instrument regularly based on the need to ensure the accuracy of the measured value of the instrument.
2 Take out the battery in the digital centimeter when the thickness gauge is not put into operation for a long time so as to avoid leakage of liquid.
3 Take care of the cleanness and maintenance of the thickness gauge. And regularly add a small amount of clock oil for maintenance to ensure the flexibility of the lifting bar.
4 When replacing the presser feet or the thickness gauge is not under operation, please put the rubber pad placed between the presser feet and the reference plate for the protection of the measurement plane.
6 Check the thickness gauge before using it. Check whether the screws are loose and whether the lifting bar moves normally or not. There shall be no stagnation or excessive looseness. Besides, check whether the electrical part of the connection line is loose and whether the switches or other parts can work well. But when you do this, the thickness gauge can not be connected to the power supply
For more information about the digital thickness gauge, welcome to visit other blogs on our website.



This Post Has 0 Comments